Settings/Music
< Settings
Jump to navigation
Jump to search
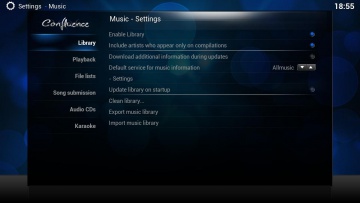
Library
- Enable Library
- If unchecked all references to Library Mode are removed from the GUI (Default on).
- Include artists who appear only on compilations
- Determines if artists that appear only on compilations are shown in the library artist view (default on).
- Download additional information during updates
- Automatically fetches album and artist information via scrapers during scan.
- Default service for album information
- Selects the default album information source.
- Settings
- Settings for the selected music information source
- Update library on startup
- Checks for new and removed media files on XBMC startup.
- Clean Library...
- This funtion will perform a number of 'cleanup' tasks on your music database and can be run if you have moved, deleted or renamed files.
- Removes any songs with invalid paths
- Removes any albums which have no references
- Removes any artists which have no references
- Removes any genres which have no references
- Removes any paths which have no references
- Export Music Library
- Exports the Music Library database to XML files.
- Import Music Library
- Imports a XML file into the Music Library database. The data is only imported if the entry exist.
- If it exists:
- It removes all current info for that entry from the database.
- Inserts the info for that entry from the XML file.
See more here: Import - Export Library
Playback
- Play the next song automatically
- XBMC automatically plays the next item in the current folder. For example, in Files View: After a track has been played, XBMC would automatically play the next track in the same folder.
- Queue songs on selection
- When songs are added to a playlist they are queued instead of playback starting immediately.
- Replaygain volume adjustments
- When enabled, XBMC will read the Replay Gain information encoded in your audio files by a program such as MP3Gain and normalize the sound levels accordingly. You have the option of either using track levels or album levels.
- Crossfade between songs
- Enabling this will cause the player to smoothly fade from one audio track to the next. You can set the amount of overlap of the tracks from 1-15 seconds.
- Crossfade between songs on the same album
- You have the option of only crossfading between songs on the same album or all.
- Visualization
- Determines which visualization will be displayed while listening to music. For more information, see Visualizations.
- Default player
- Choose the default player to be used for music
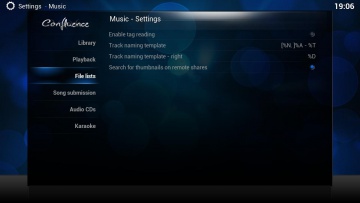
File lists
- Enable Tag Reading
- Enabling tag reading will read the tag-information written in every song. This will slow down read time of large directories (particularly over a network), but will give, if properly named, a better description of your music files. If you wish to have the tag information without having to wait for them to load each time, you can “Scan” your songs from My Music:Songs. This will read the tags of all songs in this directory (and it's subdirectories) and add the information to the database (stored in the “albums” folder). Next time you go into that directory, XBMC will first look for the tag information in the database, which should speed up the directory loading.
- Track Naming Template
- Controls the way that the names of songs are displayed in the UI. In order to function properly, ID3 tags need to be enabled. For a list of options that can be used, see Tags Available for Audio Files
- Track Naming Template Right
- Works in the same manner as Track Naming Template, but is used for the information on the right-hand side of the UI. It is commonly used to display the length of tracks.
- Look for thumbs on remote shares
- When this option is on, XBMC will search for thumbs on remote shares (which as of the time of writing includes DVD and CD media as well, due to the long seek/read times). This can often slow down listing of network folders quite dramatically (particularly if there are many items that have no thumbs), hence the option to turn it off. If you Scan your music collection while this option is on the thumbs are cached locally, and a reference to the thumb is stored in the music Library. This significantly speeds up listings. Turn the option off after the scan if you have many folders/files without associated thumbs. For more information on creating custom thumbnails, see Thumbnails
Song submission
- Submit Songs to LastFM
- Allows you to submit information about the music that you play to LastFM.
- Submit LastFM Radio to LastFM
- The same as above, but applies to songs played through LastFM radio.
- LastFM username and password
- This is where you enter the username and password for your LastFM account.
- Submit Songs to Libre.fm
- Allows you to submit information about the music that you play to Libre.fm.
- Libre.fm username and password
- This is where you enter the username and password for your Libre.fm account.
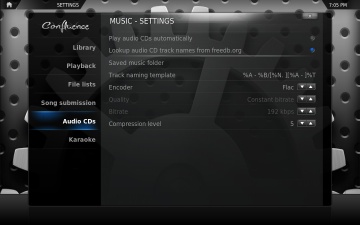
Audio CDs
- Lookup Audio CDs on freedb
- This will read the information belonging to a inserted audioCD from an internet database. Thus every song will get its correct name and artist displayed. The IP Address of the CD Database is set in the advancedsettings.xml.
- Saved music folder
- This option defines the location on your hard drive that ripped tracks will be saved to. (Note: To rip to a Samba share, you must define the rip location via advancedsettings.xml.)
- Track Naming Template
- Controls the way that your ripped songs will be named. For a list of options that can be used, see Tags Available for Audio Files
- Encoder
- This option defines which audio encoder to use when ripping.
- Quality
- This option defines in which quality you want to rip your files.
- Bitrate
- This option defines which bitrate to use for the specified audio encoder for audio compression.
- Compression level
- For FLAC define compression level, default 5
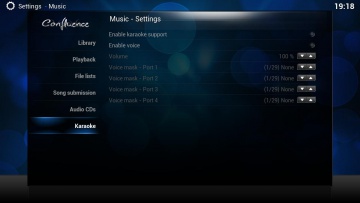
Karaoke
See main article: HOW-TO setup XBMC for Karaoke (and the article on HOW-TO create LRC karaoke lyrics files).
- Enable karaoke support
- This turns on XBMC's karaoke function. When playing any music file, XBMC will look for a matching .cdg file and will display its graphics.
- Enable Voice
- This enables voice to be played through a connected communicator set.
- Volume
- This adjusts the voice output level. This is independent of general volume. TIP: Keep this at 100%, turn down general volume, and turn up the volume on your TV or HiFi
- Voice Masks
- These options will apply sound effects on the voice output, depending on which Xbox controller port the communicator(s) are connected through.


