
I've never used bios editor on a chip before. I wish I could help with that but it seems like your on the right track.lordalex wrote:Ok, i just flashed the bios again.
If i start my xbox with the eject button, the flodder is not showing up and i just see the xbox logo.
If i start my xbox via power button, im entering the modchip menu. After that i start with modchip bios and the flooder is showing up. After this, nothing happens. I just see the xbox logo and nothing comes up anymore. No error, but also no booting from cd
XBOX 2TB SATA Upgrade Tutorial
-
RandySlim76

- Posts: 19
- Joined: Sat Aug 05, 2017 1:31 am
- Been thanked: 2 times
Re: XBOX 2TB SATA Upgrade Tutorial
Re: XBOX 2TB SATA Upgrade Tutorial
I ordered another sata- ide connector from aliexpress for 3€. It has the option to choose between master/ slave. Maybe this will help.
-
RandySlim76
- Posts: 19
- Joined: Sat Aug 05, 2017 1:31 am
- Been thanked: 2 times
Re: XBOX 2TB SATA Upgrade Tutorial
The pins on the Kingston that you have is master and slave also...... So your chip is set to dual boot One from power button and one from eject. Does your chip have a dip switch block? Which chip is it exactly?lordalex wrote:I ordered another sata- ide connector from aliexpress for 3€. It has the option to choose between master/ slave. Maybe this will help.
Re: XBOX 2TB SATA Upgrade Tutorial
I have the xchanger 2.1
EDIT:
Got it to work. With the setup from above and again the 80 pin ATA cable. It detected my harddrive now!
So i think it was the mix of flodder activated and the 80 pin cable to get it to work.
Third edit.
So its like you said. If i start with eject button, its a fast boot and im getting error 7. If i boot via power button into chip menu and select the bios, i can boot with new hdd.
Do you have any idea how to stop fast boot with eject? Or is it a chip feature i cant stop?
-
RandySlim76
- Posts: 19
- Joined: Sat Aug 05, 2017 1:31 am
- Been thanked: 2 times
Re: XBOX 2TB SATA Upgrade Tutorial
I have never heard of a Xchanger. So I began my search. Most sites about it are now down. I found at of info on German sites. I also found this.lordalex wrote:I have the xchanger 2.1
EDIT:
Got it to work. With the setup from above and again the 80 pin ATA cable. It detected my harddrive now!
So i think it was the mix of flodder activated and the 80 pin cable to get it to work.
Third edit.
So its like you said. If i start with eject button, its a fast boot and im getting error 7. If i boot via power button into chip menu and select the bios, i can boot with new hdd.
Do you have any idea how to stop fast boot with eject? Or is it a chip feature i cant stop?
http://www.eurasia.nu/modules.php?name= ... rby=titleD
I'm still searching but maybe it is booting from two different BIOS's. One bios back tired to the eject and one to the power. Don't hold me to that though.

Re: XBOX 2TB SATA Upgrade Tutorial
Hello There everybody!
I need your help please!
You see, I have been working on my cloning for my Xbox for the last 2 months with multiple HDD but none of them worked not by a long shot.
Then I came across this forum and gave me some great idea on how to make this work.
I truly do appreciate the tutorial and what I need for my project to work but the one I have for my HDD is the Seagate Barracuda and this one is a 3tb.
Now, I know it says that I can't go above 2tb but the reason I did that is because there are people who sell their Xbox going up to 3tb and 4tb.
I asked them for help on how did they get theirs to go for 3tb and 4tb original xbox?
They gave me the answer saying "We've made a special software that can recognize the system file" and long story short, they obviously thought that I was going on a competition to sell Original Xbox selling up to 3tb to 4tb and it's not that.
I just want to have fun with my Original Xbox project I built with my 2 hands, this project is basically my pride.
Okay, now for the serious question: Is it possible to go beyond 2tb for cloning my xbox or do i have to go below 2tb or just 2tb alone?
Please help me out here, I've been at this for 2 months and I wish to know why 3tb is not possible in deep detail.
I happen to be very Analytical on anything but a fun loving guy.
Thank you for reading this very long message and hopefully we can chat very soon.
Re: XBOX 2TB SATA Upgrade Tutorial
Hi ARMster , welcome to the forumARMster wrote:Hello There everybody!
I need your help please!
You see, I have been working on my cloning for my Xbox for the last 2 months with multiple HDD but none of them worked not by a long shot.
Then I came across this forum and gave me some great idea on how to make this work.
I truly do appreciate the tutorial and what I need for my project to work but the one I have for my HDD is the Seagate Barracuda and this one is a 3tb.
Now, I know it says that I can't go above 2tb but the reason I did that is because there are people who sell their Xbox going up to 3tb and 4tb.
I asked them for help on how did they get theirs to go for 3tb and 4tb original xbox?
They gave me the answer saying "We've made a special software that can recognize the system file" and long story short, they obviously thought that I was going on a competition to sell Original Xbox selling up to 3tb to 4tb and it's not that.
I just want to have fun with my Original Xbox project I built with my 2 hands, this project is basically my pride.
Okay, now for the serious question: Is it possible to go beyond 2tb for cloning my xbox or do i have to go below 2tb or just 2tb alone?
Please help me out here, I've been at this for 2 months and I wish to know why 3tb is not possible in deep detail.
I happen to be very Analytical on anything but a fun loving guy.
Thank you for reading this very long message and hopefully we can chat very soon.
I am no expert here but am advised by others that a 2 TB will not max out an Xbox as it will now show a true 2TB however a 3TB such as you have will indeed make a full 2TB available to use so if it wasn't for the wasted space / cost , a 3TB or 4 TB would always give you the full 2TB that the XBOX is capable of .
I know this isn't exactly what you asked but may help you at some point
Others will give the explanation as to why only 2TB is the limit but I know that is correct .
Sent from my Moto G (4) using Tapatalk
Re: XBOX 2TB SATA Upgrade Tutorial
Thank you for your reply there!hawsey wrote: ↑Thu Oct 26, 2017 11:36 pmHi ARMster , welcome to the forumARMster wrote:Hello There everybody!
I need your help please!
You see, I have been working on my cloning for my Xbox for the last 2 months with multiple HDD but none of them worked not by a long shot.
Then I came across this forum and gave me some great idea on how to make this work.
I truly do appreciate the tutorial and what I need for my project to work but the one I have for my HDD is the Seagate Barracuda and this one is a 3tb.
Now, I know it says that I can't go above 2tb but the reason I did that is because there are people who sell their Xbox going up to 3tb and 4tb.
I asked them for help on how did they get theirs to go for 3tb and 4tb original xbox?
They gave me the answer saying "We've made a special software that can recognize the system file" and long story short, they obviously thought that I was going on a competition to sell Original Xbox selling up to 3tb to 4tb and it's not that.
I just want to have fun with my Original Xbox project I built with my 2 hands, this project is basically my pride.
Okay, now for the serious question: Is it possible to go beyond 2tb for cloning my xbox or do i have to go below 2tb or just 2tb alone?
Please help me out here, I've been at this for 2 months and I wish to know why 3tb is not possible in deep detail.
I happen to be very Analytical on anything but a fun loving guy.
Thank you for reading this very long message and hopefully we can chat very soon..
I am no expert here but am advised by others that a 2 TB will not max out an Xbox as it will now show a true 2TB however a 3TB such as you have will indeed make a full 2TB available to use so if it wasn't for the wasted space / cost , a 3TB or 4 TB would always give you the full 2TB that the XBOX is capable of .
I know this isn't exactly what you asked but may help you at some point
Others will give the explanation as to why only 2TB is the limit but I know that is correct .
Sent from my Moto G (4) using Tapatalk
Yeah, I figure that is the case to make this project will work in many ways.
I basically got the 1tb hard drive just to be on the safe side because I have been driving back and forth towards Fry's electric shop for them and until I can make this work, I will get the 2 tb hard drive to make another transfer.
In any case, here is another question.
After when I make a clone for my hard drive using Chimp, do I need to copy my eeprom to my hard drive or does it already gets transfer?
I still can't get it to work. I keep getting an error when I use the SATA hard drive with the adapter.
Re: XBOX 2TB SATA Upgrade Tutorial
Thanks for all that info, Rocky!Rocky5 wrote: ↑Sun Dec 04, 2016 4:39 am (...)
These are the only adapters I will buy now 100% success rate.
Current adapter I use. ( used in my v1.1 TSOP flashes M8+ Xbox )
Startech - note I got mine from eBay
Other adapter I use. ( used in my v1.6 test box and my kids 2 Xbox, all softmodded )
Cheap EBay adapter - must look like the image
When using the cheapo adapter, how do you switch IDE modes? E.g. master, slave, CS.
I have tried a similar adapter (Ebay link) with all sorts of IDE cables. I know it is different. Mine only worked with very short 80-wire cables. It did work with the only other 40-wire cable I tried, but not with the IDE cable that was in the Xbox originally. All cables seemed to work if the DVD drive was disconnected, though.
This leads me to the other thing I have been wondering: how do you guys get a hold of fitting 80-wire cables? I mean, the Xbox uses a very uncommon setup for the IDE cable where the master plug is very close to the mobo. No other IDE cable I tried would fit with the regular position of HDD and DVD drive. The only 80-wire cable I could find was 75cm long, which might be too long, knowing that the 80-wire cables are specified for a max length of ca. 45cm.
I considered tailoring my own 80-wire cables, but I could only find the naked cables, not the plugs.
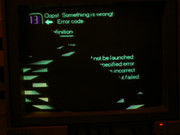
Whenever my setup does not work, I get this error, which I call the "wicked error 13". It looks always like this:
EDIT: I bought your suggested cheapo adapter. It did not work, exactly as did the different cheapo adapter I had bought earlier. I even shortened the long 80-wire IDE cable I had bought to the same length as the original 40-wire IDE cable. But it still does not work. I might try a different SATA HDD, this time with 2.5" form factor.
Last edited by Tosnic on Sat Jun 09, 2018 8:32 pm, edited 2 times in total.
Re: XBOX 2TB SATA Upgrade Tutorial
If the eeprom was on your original HDD that you cloned, it is now on the clone, too. But why would you need to copy it when you have no need to lock your HDD? You TSOP flashed your Xbox, did you? With a custom BIOS you do not need to lock your HDD. And most SATA drives do not support locking. Use this list for reference: LinkARMster wrote: ↑Thu Nov 02, 2017 4:04 pmIn any case, here is another question.
After when I make a clone for my hard drive using Chimp, do I need to copy my eeprom to my hard drive or does it already gets transfer?
I still can't get it to work. I keep getting an error when I use the SATA hard drive with the adapter.
-
ViraLicious
- Posts: 4
- Joined: Mon Jul 09, 2018 1:43 pm
- Been thanked: 1 time
Re: XBOX 2TB SATA Upgrade Tutorial
Hi,
I just recently modded my Xbox with the Aladdin XT 2 Plus chip and installed a new HDD.
I've faced a quite annoying issue... My HDD consists of 250GB and I only want 1 partition on my Xbox to hold all my games. So I want only an F partition, no G. However, whatever I seem to do, regardless of method, app or whatever - whenever I first go into XBpartitioner 1.3 and delete the second partition, add all the data for F and make sure the cluster is at 16 - after a reboot, it ALWAYS reverts back to two partitions! It frustrates the hell out of me! I've gone into the settings and disabled G, but alas, it still gets re-enabled after a reboot!
Anyone had this issue before and know how to solve it? Maybe I am anal about this, but I just want the F partition and neither need or want G. The Xbox sure seems to want it though... I've reinstalled the HDD from scratch and picked that I didn't want a G drive, but it didn't help. After the rebooted it was there again.
Any ideas?
-
Coldly-Indifferent
- Posts: 436
- Joined: Thu Mar 19, 2015 4:01 am
- Has thanked: 74 times
- Been thanked: 56 times
Re: XBOX 2TB SATA Upgrade Tutorial
Are you sure you're deleting G:\(Extended Partition 7) and not trying to delete Partition 2? Partition 2 is your C:\ drive and if that is what you're trying to delete it is probably why it is not allowing you to do that.
I'm no expert on using XBPartitioner v1.3 but have you used the Back button to view the Help page? That lists the controls such as "B" = distribute space among extended partitions and "R Thumb" = enable/disable current partition. Note that you need to press Start on that page to be able to edit the partitions.
Personally I'd used Chimp 261812 in preference - much clearer/simpler GUI and will distribute and correctly format whatever partition set up you've chosen.
Maybe XBPartitioner v1.3 can do this but with Chimp 261812 I'm pretty sure that if you redistribute the free space on the HDD it won't expand the F:\ drive as you can do on PC, it will reformat all the free space completely. That means anything you have on F:\ and G:\ currently will disappear. So back it up to PC before you do anything.
-
ViraLicious
- Posts: 4
- Joined: Mon Jul 09, 2018 1:43 pm
- Been thanked: 1 time
Re: XBOX 2TB SATA Upgrade Tutorial
Hi and thanks for your reply.Coldly-Indifferent wrote: ↑Tue Jul 10, 2018 12:24 am Are you sure you're deleting G:\(Extended Partition 7) and not trying to delete Partition 2? Partition 2 is your C:\ drive and if that is what you're trying to delete it is probably why it is not allowing you to do that.
I'm no expert on using XBPartitioner v1.3 but have you used the Back button to view the Help page? That lists the controls such as "B" = distribute space among extended partitions and "R Thumb" = enable/disable current partition. Note that you need to press Start on that page to be able to edit the partitions.
Personally I'd used Chimp 261812 in preference - much clearer/simpler GUI and will distribute and correctly format whatever partition set up you've chosen.
Maybe XBPartitioner v1.3 can do this but with Chimp 261812 I'm pretty sure that if you redistribute the free space on the HDD it won't expand the F:\ drive as you can do on PC, it will reformat all the free space completely. That means anything you have on F:\ and G:\ currently will disappear. So back it up to PC before you do anything.
I am only deleting the G extended partition. I've tried basically every method available in XBpartitioner 1.3 I could find, but it always ended with it working until I reboot. However, I just noticed that when I use the Hexen disc and don't boot into the UnleashX dashboard, then it says I have 230GB free on F and no G drive - but as soon as I boot into the UnleashX dashboard it says I only have 123GB on F and depending on if I have G enabled it says it has 107GB free, or if it's disabled the additional 107GB is just missing. In the File Explorer it says I have 123GB free on F too, but again, when I boot into Hexen it all looks correct... I followed your advice and used Chimp, it looked correct there as well. Kind of confusing.
-
Coldly-Indifferent
- Posts: 436
- Joined: Thu Mar 19, 2015 4:01 am
- Has thanked: 74 times
- Been thanked: 56 times
Re: XBOX 2TB SATA Upgrade Tutorial
But did you actually use the Chimp (Master HDD) extended partition options to reformat the F:\ drive to use all the available space?
The only other thing I can think of is that the BIOS being used does not have LBA48 support. That would limit the partition sizes to 137GB max (137,000,000,000 Bytes ie. about 127GiB which is roughly what you're reporting is free on F:\).
Xbox BIOS are not my thing so you'll need others' advice if that is what the problem has been caused by.
-
ViraLicious
- Posts: 4
- Joined: Mon Jul 09, 2018 1:43 pm
- Been thanked: 1 time
Re: XBOX 2TB SATA Upgrade Tutorial
I used Chimp too yes, but ended up with the same results.Coldly-Indifferent wrote: ↑Tue Jul 10, 2018 1:07 pm But did you actually use the Chimp (Master HDD) extended partition options to reformat the F:\ drive to use all the available space?
The only other thing I can think of is that the BIOS being used does not have LBA48 support. That would limit the partition sizes to 137GB max (137,000,000,000 Bytes ie. about 127GiB which is roughly what you're reporting is free on F:\).
Xbox BIOS are not my thing so you'll need others' advice if that is what the problem has been caused by.
It sounds like there could be something like that going on yes. However, I've seen others who've used bigger drives with the same setup and they've seemed to get it working just fine. But maybe I'm wrong.
I'm using the Evox M8Plus16 F + G Mod 256K BIOS.
Thank you for your help thus far!
-
ViraLicious
- Posts: 4
- Joined: Mon Jul 09, 2018 1:43 pm
- Been thanked: 1 time
Re: XBOX 2TB SATA Upgrade Tutorial
Solved it!
Had to build a new BIOS with EvTools. Works great now!
Thanks for the help!
Had to build a new BIOS with EvTools.
Thanks for the help!
-
gamerchris555
- Posts: 1
- Joined: Mon Apr 29, 2019 5:59 pm
Re: XBOX 2TB SATA Upgrade Tutorial
great and very helpful but so many times I saw MB and was like WTF does he get xxxMB from does he really mean GB? yes you have many pictures that show GB(nnn,000,000,000 Bytes or nnn,000MB) but you use the term MB in some cases you say something like 260MB when you should have used 260GB or 260,000MB please fix your terms for the noobs who would just rage and say your tutorial doesn't work rather than has typos
Re: XBOX 2TB SATA Upgrade Tutorial
I have problems too. I've bought 2 sata adapter. One has a Marvell chipset.
My box is a 1.6 with Aladin chip.
hard disk is a 2Tb Seagate Barracuda.
Bios is Evox M8 +
If I jumper the adapter it only goes with master. Otherwise I get error 7.
If i jumper it with Master the box start but gives no picture out. I then press on eject (open and close) I get picture and the box boots normally and I can partition the hd. Unfortunately, it always works only on start and then eject.
I'm just wondering why I always can boot with press the eject button after press start to boot . Before that was a 160Gb in it which boot normally by press start. So, I can not start with only the eject button because the chip is not active.
The same thing I have with the other adapter.
The cable is an IDE round cable Ultra ATA 66/100/133/40 pole post coupling (IDC) with 80 pin cable.
-
GoTeamScotch

- Posts: 268
- Joined: Sat Apr 06, 2013 2:17 am
- Has thanked: 97 times
- Been thanked: 75 times
Re: XBOX 2TB SATA Upgrade Tutorial
The jumper should either be cable select or master. The Xbox expects the dvd drive to be slave and the HDD to be master on the IDE cable.
I would recommend checking your dashboard paths and files. I don't use Evox M8 much these days, but I think it checks (as most bioses do) for C:\evoxdash.xbe, E:\evoxdash.xbe, plus a few other default paths. With your Xbox booted up, open up a file manager app. Check your C and E drives for these files. Try loading them up right from there. If they give you the same black screen, then that indicates that those evoxdash.xbe files should be replaced with working copies.Merlin2k wrote: ↑Sun May 19, 2019 6:42 pm If i jumper it with Master the box start but gives no picture out. I then press on eject (open and close) I get picture and the box boots normally and I can partition the hd. Unfortunately, it always works only on start and then eject. I'm just wondering why I always can boot with press the eject button after press start to boot . Before that was a 160Gb in it which boot normally by press start. So, I can not start with only the eject button because the chip is not active.
The fact that your old 160GB drive worked just fine indicates that the issue is probably with how your hard drive is structured... meaning which files are located where.
Also, do you have a config.bin file on your C drive? If that file contains special configuration options for Evox M8, then that can affect the paths that the bios looks for to find evoxdash.xbe. If that file is present, you might try renaming it to config.bin.bak (or something) to check to see if that is affecting your bootup process.
One final thing to keep in mind: if your C drive contains softmod files, you might try removing those and restoring the C drive back to stock. I've seen modchips get hung up trying to load softmod files before (softmod files aren't necessary when you have a custom bios).
