
General Mods
-
Elite_Snafu

- Posts: 20
- Joined: Sat Sep 14, 2013 7:00 am
- Location: ON, Canada
- Has thanked: 4 times
Re: General Mods
so i have figured out that i needed to wait a bit longer on the paint. So i figure ill look into the USB install. would it be possible to just wire the USB's into one of the controller ports, and still have use of the controller?
-
Xphazer

- Posts: 524
- Joined: Wed Jul 04, 2012 4:39 am
- Location: Montréal
- Has thanked: 238 times
- Been thanked: 106 times
Re: General Mods
As far I can think, not much you can do on a Xbox with laptop parts. A heatsink for the MCPX chip if you are lucky. I don't even have any on my machines, not really needed.
To clarify the USB thing, what was suggested is to use a socket from a laptop mobo. I would not recommend it as the socket will probably felt apart when you will desolder it from the motherboard. If you want a USB port get a 1-2-3$ (dollar store) USB extention cord or a PC case USB Bracket (see the picture below).
And yes, you just wire it to an existing gamepad port.
Don't even waste a single minute on the screen, you would need to do some serious hacking to get it to work out of the laptop. Am I right with this one Asbo?
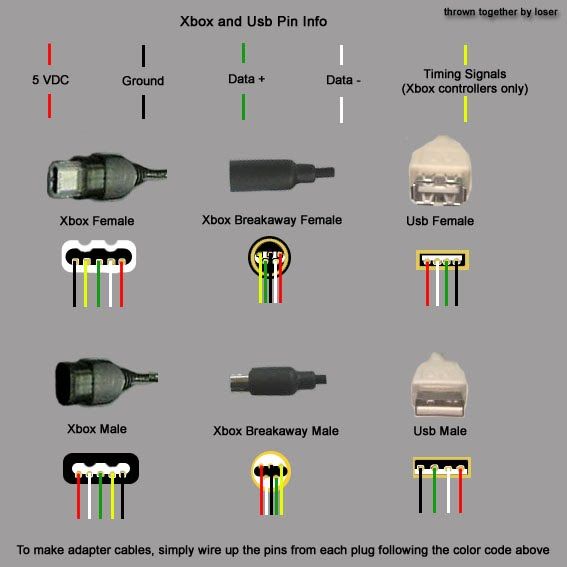
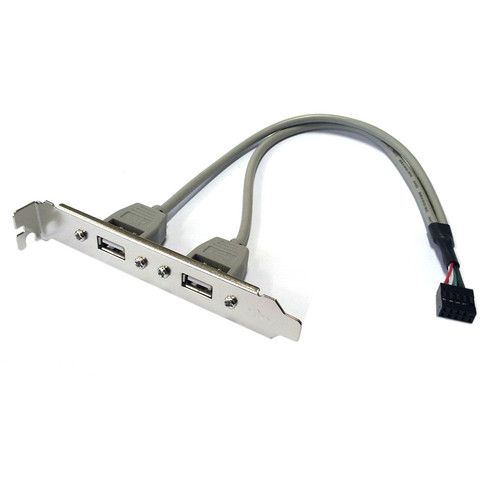
-
Elite_Snafu
- Posts: 20
- Joined: Sat Sep 14, 2013 7:00 am
- Location: ON, Canada
- Has thanked: 4 times
Re: General Mods
well i started easy and i went with the Painting the controller, 
I think i might need to get some sleep before working on the USB ports. ill be taking a quick look in a few.
The Picture is http://postimg.org/image/ntl255sk3/
I think i might need to get some sleep before working on the USB ports. ill be taking a quick look in a few.
The Picture is http://postimg.org/image/ntl255sk3/
-
asbo

- Posts: 594
- Joined: Sun Jul 08, 2012 3:38 pm
- Location: Norfolk, UK
- Has thanked: 17 times
- Been thanked: 54 times
Re: General Mods
mmm yes and no, no soldering required which lowers the difficulty level for a lot of people I think. But you need to be able to disassemble the laptop without breaking anything(or not breaking anything attached to the LCD panel at least).Xphazer wrote:Don't even waste a single minute on the screen, you would need to do some serious hacking to get it to work out of the laptop. Am I right with this one Asbo?
Process is:
Disassemble laptop and identify LCD panel model number -> ask seller of driver boards if they can program a board for that model number -> send seller money and wait for it to arrive -> attach the two LCD cables to the driver board and apply power(remember to order a PSU if you don't have one) -> hack together some sort of stand(I used to existing plastic housing) -> all done
When you add up the money spent (especially if you had to buy a PSU), the time you spent fiddling around with it and the fact you can't plug an xbox straight into it, its probably cheaper to find a SoG monitor on ebay or somewhere. But where's the fun in that?

-
Elite_Snafu
- Posts: 20
- Joined: Sat Sep 14, 2013 7:00 am
- Location: ON, Canada
- Has thanked: 4 times
Re: General Mods
How would I go about doing that? still waiting on the paint, i want to make sure the paint is entirely dry before putting it back together. and i was thinking of doing the USB mod in the next few minutes. Seeing as it is not entirely "needed" to solder for the USB port. as well i think i am just going to do the one port for now, got a male to female earlier so i will be throwing that on. When a memory card or external drive gets connected, does it need to be formated in fatx for the xbox to read?Spongy wrote:Why not install an on/off switch in that controller while it's apart? It's one of my favorite mods.
You can do the xbox portion when you do the USB mod.
-
Elite_Snafu
- Posts: 20
- Joined: Sat Sep 14, 2013 7:00 am
- Location: ON, Canada
- Has thanked: 4 times
Re: General Mods
Read that entire page, could not find anything on the on off switch. Is there a tutorial on here for doing that?  Also, does a USB stick or an external hard drive have to be formatted in FatX for the Xbox to read it?
-
Xphazer
- Posts: 524
- Joined: Wed Jul 04, 2012 4:39 am
- Location: Montréal
- Has thanked: 238 times
- Been thanked: 106 times
Re: General Mods
http://dwl.xbox-scene.com/~xbox/xbox-sc ... als/01.pdf
http://www.xbox-scene.com/xbox-tutorial ... 1|241|#191
Tutorials> Tutorials for the Original Xbox> Xbox Hardware Addons/Modifications Guides> Switches and RF mods> Install a reset switch in the Xbox Game Controller.
http://www.xbox-scene.com/xbox-tutorial ... 1|241|#191
Tutorials> Tutorials for the Original Xbox> Xbox Hardware Addons/Modifications Guides> Switches and RF mods> Install a reset switch in the Xbox Game Controller.
-
xman

- Posts: 1289
- Joined: Wed Jul 04, 2012 2:30 pm
- Location: Sydney, Australia
- Has thanked: 55 times
- Been thanked: 168 times
Re: General Mods
First mod I do on any machine is swap the button functions over so the big button is the ON OFF and the small is the DVDrive eject. Simple swap over of two wires and it's done. You'll need a pin to extract the pins from the connector that goes to the button board and you simply swap the two wires over.
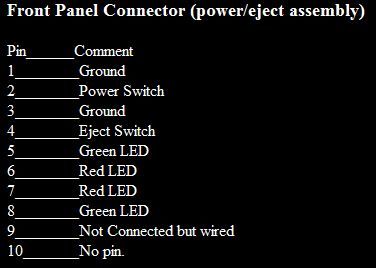
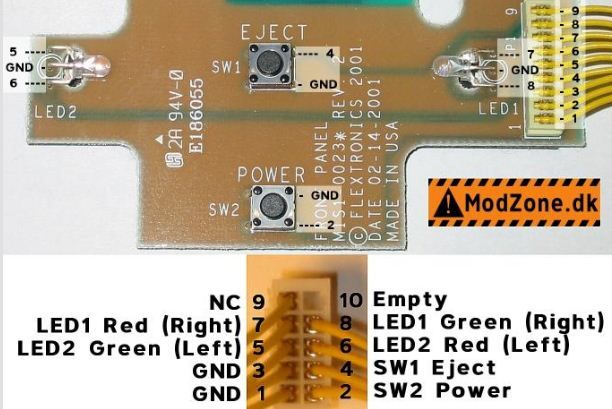
You swap over No 4 (SW1 Eject) with No 2 ( SW2 Power) and test it out. Just re-straighten out the retainer part of the pin once you get it out so when you put it back in it holds itself in the connector like it should.
You swap over No 4 (SW1 Eject) with No 2 ( SW2 Power) and test it out. Just re-straighten out the retainer part of the pin once you get it out so when you put it back in it holds itself in the connector like it should.
-
blighty

- Posts: 189
- Joined: Sun Jul 22, 2012 12:56 am
- Location: England
- Has thanked: 26 times
- Been thanked: 8 times
Re: General Mods
i take it you mean:
I always like to unsolder one of the leds and bend the legs 180 degrees and resolder it so that you have 1 half red and 1 half green ( yellow stays yellow ) & when it cycles it looks awesome
never realized i could do it by just swapping the wires! Cheers Xman save me a lot of time in future 
dont want peeps pulling pins out XDxman wrote: You'll need a pin to extract the "wires" from the connector that goes to the button board and you simply swap the two wires over.
I always like to unsolder one of the leds and bend the legs 180 degrees and resolder it so that you have 1 half red and 1 half green ( yellow stays yellow ) & when it cycles it looks awesome
never realized i could do it by just swapping the wires! Cheers Xman
-
Elite_Snafu
- Posts: 20
- Joined: Sat Sep 14, 2013 7:00 am
- Location: ON, Canada
- Has thanked: 4 times
Re: General Mods
Well the usb mod went off without a hitch, first go. What should i do next you figure? i kinda want to paint the case but at the same time i dont, just because its a clear (ghost?) case. i might save the painting of the consoles for the ones i have in B.C.
What would happen if i connected my computer to the xbox with a male to male usb?
What would happen if i connected my computer to the xbox with a male to male usb?
-
Xphazer
- Posts: 524
- Joined: Wed Jul 04, 2012 4:39 am
- Location: Montréal
- Has thanked: 238 times
- Been thanked: 106 times
Re: General Mods
My Xbox's generally have all these mods:
128MB RAM upgrade. (Complicated, require a lot of skills and supplies.)
Internal DVD dongle (Directly connected, with a relay or a switch)and XIR (if you are using the DVD remote, its a must have).
Replace the CPU/GPU thermal paste with some high quality one.
Ports LED's
Front panel blue/white LEDs.
Clean the DVD drive. (Disassemble it, clean it, grease it).
Then if you can find the required hardware, an LCD screen.
About the fan, some will recommend a 80mm fan mod, I don't like that mod (I have it on my living room Xbox).. for a simple reason...
It cannot be perfect as I like things, it would require TIG welding (Yeah, I'm crazy like that) and precision drilling to get 4 anti-vibration rubber mount in perfect position.
I have lots of Xbox fans, I can say that some are silent, some are noisy. I just dot use the noisy ones.
If you need more inspiration, have a look to this thread: http://www.xbmc4xbox.org.uk/forum/viewt ... 140#p12066
And for tutorials the xbox-scene tutorial section and our tutorial section have plenty of them.
Feel free to ask anything you want to know about them or if there ins't any for what you want to do.
-
Xphazer
- Posts: 524
- Joined: Wed Jul 04, 2012 4:39 am
- Location: Montréal
- Has thanked: 238 times
- Been thanked: 106 times
Re: General Mods
And no, don't paint your crystal case! Give it a good bath, make it shine with some Windex and leave it to dry overnight.